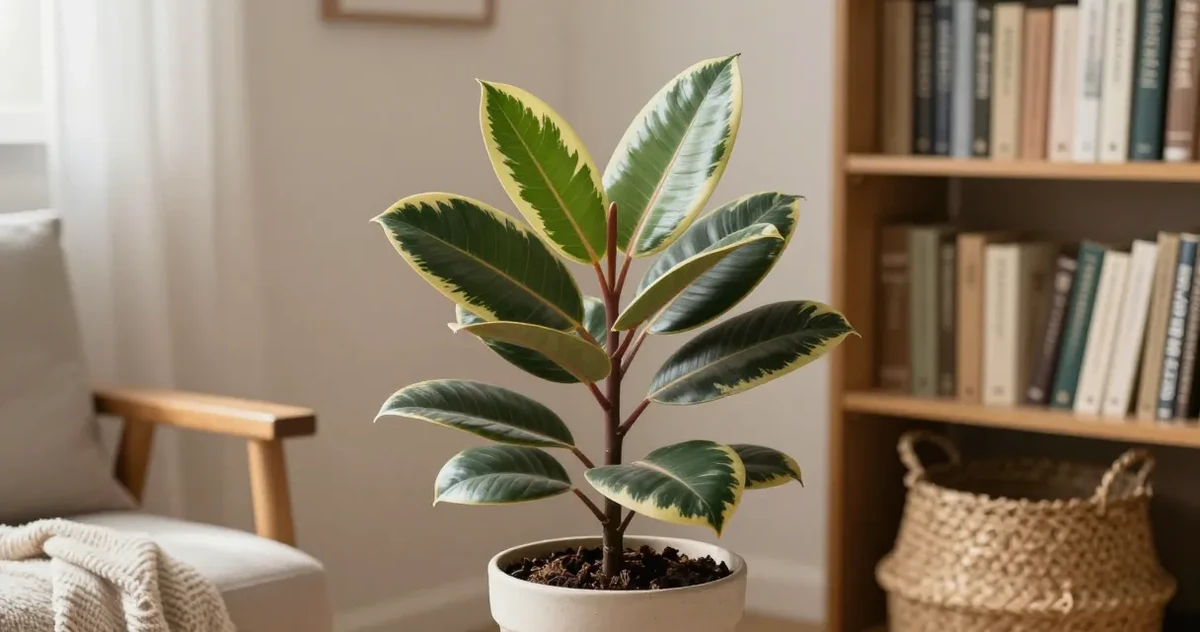
A variegated rubber plant is one of the more striking things you can bring home from a plant shop. The broad leaves come streaked with cream and sometimes pale pink, and for a while they look exactly like what you bought. Then the new leaves start arriving mostly green, or the edges go crispy and brown, and the troubleshooting spiral begins. Was it the soil? Should you repot? Add fertilizer? Change the watering schedule?
Almost nobody hits the real explanation on the first try: the plant usually needs more light than it’s getting, and the fading is how it adapts. The second biggest problem isn’t the original stressor – it’s the string of reactive changes that follow, each one adding stress before the plant has had time to respond to the last.
This guide covers what variegated rubber plants actually need, why color fades and how to stop it, the specific care mistakes that compound the problem, and how to move from worried troubleshooting to a stable routine that actually holds.
This is written for the variegated rubber plant – most often Ficus elastica ‘Tineke’ or similar cultivars – not the standard green form. The care overlaps, but the light and drainage stakes are higher when you’re trying to hold onto cream and pink coloring. For the solid-green form, the rubber plant care guide covers the essentials.
Variegated Rubber Plant Identification Snapshot
Use this quick check before you troubleshoot anything else.
- Leaves: broad, glossy leaves with cream, green, and sometimes blush-pink marbling, usually on the same leaf rather than in separate patches.
- New growth: fresh leaves often emerge with more pink or cream, then harden off into cream-and-green contrast as they mature.
- Stem and sap: stems are upright and woody over time, and damaged tissue releases a white milky sap typical of ficus.
- Growth habit: one main trunk or a few sturdy branches, not a trailing vine or a soft succulent rosette.
- Fast reality check: if the leaves are much smaller, thinner, or growing on floppy vine-like stems, you may be looking at another variegated houseplant rather than a rubber plant.
Variegated Rubber Plant Care Cards
If you want the fast version, these are the conditions that keep a variegated rubber plant stable indoors.
- Light: bright indirect light, ideally close to an east or west window, with enough intensity to hold the cream and pink coloring.
- Water: let the top 2 to 3 inches dry before watering again, then drench and drain fully.
- Soil: chunky, fast-draining potting mix rather than dense peat that stays wet for too long.
- Temperature: steady household warmth, away from cold drafts, exterior doors, and forced-air vents.
- Humidity: average indoor humidity is usually fine, but dry heat and direct airflow crisp the pale margins first.
- Placement rule: stronger light and better drainage solve more problems here than extra fertilizer or repeated repotting.
Expert note: The extension and horticultural sources behind this guide agree on the pattern that matters most: bright light preserves stronger variegation, while wet soil and cold drafts explain a large share of leaf drop and edge damage indoors.
Lookalikes and Confused-With Cases
| Plant | What looks similar | Fast difference | Why it matters |
|---|---|---|---|
| Variegated rubber plant (Ficus elastica ‘Tineke’) | Cream-and-green marbled leaves | Thick glossy leaves, woody stem, white sap when cut | Wants brighter light than the green form to hold color |
| Baby rubber plant (Peperomia obtusifolia variegata) | Cream-edged variegated foliage | Smaller, thicker succulent-like leaves on softer stems | Tolerates a smaller scale and a different watering rhythm |
| Variegated ficus benjamina | Variegated ficus sold as an indoor tree | Narrower pointed leaves and many thin, twiggy branches | More sensitive to movement and reads drafts differently |
| Variegated pothos | Cream-and-green foliage | Vining growth rather than a single upright trunk | Needs support or trailing space, not tree-style placement |
What a Variegated Rubber Plant Actually Is
A variegated rubber plant is a cultivar of Ficus elastica that produces leaves with reduced chlorophyll in parts of the leaf tissue, creating the cream, ivory, and sometimes pink-tinged markings. The most common variety you’ll find in shops is ‘Tineke,’ though ‘Variegata’ and a few others exist with similar care requirements.
The variegation is more than cosmetic. The pale sections contain less chlorophyll than standard green tissue, which means they photosynthesize less efficiently. The plant is working with fewer light-harvesting cells than a solid-green rubber plant of the same size – and it needs more light input to compensate. This is the biological basis for the care difference that most guides mention briefly but don’t explain: it’s not that variegated rubber plants are more fragile, it’s that they have a higher light threshold to stay in balance.
When light drops below that threshold, the plant responds by producing more chlorophyll in new growth. That’s why leaves come in progressively greener in dim spots – it’s not disease or nutrient deficiency, it’s the plant compensating for energy shortfall by building more photosynthetic tissue.
Not sure what plant you are caring for?
Open KnowYourPlant, snap a photo, and get the plant name plus care notes matched to the species in front of you.
Identify your plantWhat Most Care Guides Miss
Here’s how the decline usually unfolds: the plant arrives looking vivid, you put it in a spot that feels reasonably bright, and a few months later the new leaves are mostly green. The instinct is to add something – fertilizer, a new soil mix, a supplement. The plant looks the same or slightly worse. Repotting seems like the next logical step. The repotting stresses the roots. A few more leaves drop. Now it’s unclear whether the problem is watering, the new pot, or the old soil.
This is the spiral that most care guides don’t address because they focus on conditions, not on the error chain.
The first mistake is misidentifying the cause. Fading variegation in rubber plants is nearly always a light problem, not a soil or feeding problem. Proven Winners, whose horticultural trial program commercially introduced the Tineke cultivar, states that variegated rubber plants display their strongest variegation when given as much bright light as possible indoors. A spot that’s perfectly comfortable for a regular rubber plant – say, 10 to 12 feet back from a south window – often isn’t enough to hold Tineke’s markings. Fertilizer in a dim spot produces faster, greener growth. It does not bring the cream and pink back.
The second mistake is treating each new symptom as a new problem. Brown edges appear, so the plant gets repotted. The repotting causes leaf drop, so the watering schedule changes. The new schedule leads to overwatering, so there’s another soil change. Each round adds stress, and a stressed plant produces more symptoms that look like they’re asking for more intervention. They usually aren’t.
The reset rule: pick the single most likely cause, adjust one thing, and give the plant four to six weeks to respond before doing anything else. If you’ve made more than two changes in the past month, the first fix is to stop making changes.
Where Owners Usually Get Stuck
The recurring grower questions behind this topic are remarkably consistent. People tend to assume fading color means the plant needs feeding, or they react to brown edges with a repot, a soil swap, and a new watering schedule all at once. Another common pattern is a plant arriving home already too wet, then sitting in lower light while the owner keeps watering because the leaves look unsettled.
That matters because the rescue path is usually simpler than the panic path:
- Fading color: check light before fertilizer.
- Brown edges with damp soil: check drainage before watering again.
- Leaf drop after a recent move or repot: stop changing multiple variables and let the plant stabilize.
- Blotches plus pest suspicion: inspect the undersides of leaves before treating it as a sun or watering problem.
Treat those as common confusion patterns, not guaranteed diagnoses. The goal is to narrow the first check so you do less accidental damage while troubleshooting.
Want a care schedule you do not have to remember?
KnowYourPlant sends watering, feeding, repotting, and seasonal reminders based on the plants you actually own.
Get care remindersLight: The First Thing to Get Right
Within a few feet of a bright east- or west-facing window is the sweet spot for a variegated rubber plant indoors. That gives the plant generous light without direct midday sun hitting the pale leaf sections – those have even less pigment protection than green tissue and can scorch from direct summer afternoon sun. If you see pale, papery patches on the cream areas after a sunny spell, that’s sun damage on plant leaves, not a watering problem.
A north-facing room is too dim for good color retention. Low-light spots work for many houseplants, but a variegated rubber plant in a dim corner will gradually push out greener and greener leaves as it compensates for low energy intake. If your best available spot is still fairly dim, a grow light for indoor plants placed close to the plant can fill the gap – especially through winter months when natural light drops significantly in most homes.
Window placement and color outcome:
| Spot | What to expect |
|---|---|
| Within 3–4 feet of a bright east or west window | Strong variegation, best color on new growth |
| 5–8 feet from a filtered south window | Decent color, some fading on newer leaves |
| North-facing room or dim corner | New leaves progressively greener over time |
| Direct afternoon south/west sun without a curtain | Risk of scorching the pale sections |
Simple light check: Hold your hand about a foot above the plant’s pot at midday. A crisp shadow means the light is working. A faint, barely-there shadow means the spot is too dim for strong variegation.
Save this plant plan before you forget the details.
Keep the plant, diagnosis notes, reminders, and care changes in KnowYourPlant so the next decision is based on your actual plant history.
Open KnowYourPlantThe First Two Weeks After Bringing It Home
Variegated rubber plants are sensitive to change, and the first two weeks after arrival are when most early problems start – not necessarily from anything you do wrong, but from the plant adjusting to a new environment.
Nursery pots almost always contain a peat-heavy mix that held moisture well during transit and storage. That same mix can stay wet far longer in your home, especially if the plant moves from a bright greenhouse or shop to a standard indoor spot. Soil that looks like it should be dry by now often isn’t – and a plant sitting in damp soil while adjusting to lower light is already under stress before you’ve done anything.
Before-you-water-again checklist for new purchases:
- Push your finger into the soil 2 to 3 inches deep. Still cool and damp? Wait another day or two.
- Is the pot sitting inside a decorative cachepot that might be trapping water underneath? Check.
- Has the plant been repotted recently or moved around multiple times? Give it 2 to 3 weeks to settle before making any changes.
- Check the undersides of leaves for webbing or fine sticky residue before assuming new spots are watering-related.
One or two dropped leaves while the plant adjusts is normal. What to watch for is ongoing leaf loss combined with soil that stays wet – that signals a drainage fix, not a watering schedule adjustment.
Watering Without Overthinking It
Let the top 2 to 3 inches of soil dry out completely before watering again. That’s the Proven Winners recommendation for Tineke specifically, and it holds up in practice. Press your finger into the soil at that depth – if it still feels cool and damp, wait another day or two.
When you do water, water thoroughly and let the excess drain completely from the bottom. Then don’t water again until that top layer is actually dry.
The plant handles a dry spell far better than sitting in soil that never fully dries out. If you’re keeping a fixed weekly schedule regardless of soil condition, that’s a reliable path toward overwatering – especially in winter, when growth slows and the plant uses water more slowly.
Signs you’re watering too often: lower leaves yellowing and dropping, soil that smells faintly sour or musty, or a stem that feels soft near the base. NC State Extension identifies overwatering as one of the primary causes of leaf drop in Ficus elastica grown indoors, alongside cold drafts and temperature drops. If you see those signs, ease back on water before doing anything else. The overwatered plant guide helps you distinguish drought stress from waterlogged soil, which can look similar in their early stages.
Soil and Drainage Matter More Than You Think
Fresh from a nursery, rubber plants often come in dense, peat-heavy potting mix that holds moisture well for the shop environment but stays wet too long in the average home – especially in decorative pots without drainage holes, or in self-watering planters.
Drainage risk checklist:
- Does the pot have a working drainage hole, not just a decorative one?
- If using a cachepot, are you emptying standing water within an hour of watering?
- Is the potting mix heavy and dense, or loose and airy?
- Are you using a self-watering planter? These are designed to keep soil consistently moist – which is the opposite of what rubber plants need. The self-watering pots guide explains where these planters work well and where they backfire.
- Has the plant been repotted more than once in the past few months? Back-to-back repotting is a documented stress source – roots disturbed twice in quick succession often show decline even when everything else looks correct.
A fast-draining mix works better than standard potting soil alone: regular potting mix cut with perlite or coarse sand is a good starting point. If repotting is genuinely necessary, give the plant time to settle before returning to normal watering. The guide on when and how to repot plants covers the signs that a plant actually needs a new pot and how to make the move less disruptive.
Common Mistakes That Make Recovery Harder
Variegated rubber plants fail more often from the wrong response to symptoms than from the wrong initial conditions. These specific patterns come up repeatedly and are worth knowing before you react to the next symptom.
Treating color loss as a fertilizer or soil problem. When cream and pink sections fade and new leaves arrive mostly green, the instinct is often to add something – a feed, a new soil mix, an amendment. None of those fix a light shortfall. Variegation fades because the plant is producing more chlorophyll to compensate for low light, not because something is missing from the soil. Feed a plant sitting in dim light and you get faster, greener growth – not brighter markings. Address light first and only then reconsider fertilizer.
Repotting as a response to every decline. Repotting stresses roots, and roots that have been disturbed twice in quick succession often show the same decline patterns as overwatering – wilting leaves, dropped lower growth, slow water uptake. If the plant has been repotted recently and is still struggling, another repot usually isn’t the answer. Stable conditions and time tend to matter more at this stage.
Watering on a fixed calendar through winter. A schedule that worked in summer often leads to overwatering by November. Light drops, growth slows, the plant uses water more slowly – and a plant watered weekly in winter is likely sitting in damp soil for stretches that stress the roots before obvious symptoms appear. Check the soil with your finger in the cooler months rather than going by a set schedule.
Misting as a humidity fix. Misting is a common instinct when edges go crispy, but the droplets evaporate in minutes and don’t meaningfully raise ambient humidity. A pebble tray with water under the pot or a small humidifier near the plant is far more effective. The guide to humidity for indoor plants covers what actually moves the needle.
Using self-watering planters without adjusting expectations. These are designed to keep soil consistently moist, which is at odds with what variegated rubber plants need. Roots sitting in continuously moist soil is a reliable path toward root problems, and the symptoms – wilting, yellowing, dropped leaves – can take weeks to appear after the damage has progressed.
Brown Edges: Work Through This Before Changing Anything
Crispy brown edges usually come from one of three things: air that’s too dry, cold drafts, or inconsistent watering that alternates between very dry and very wet. Forced-air heating in winter is a common culprit – the plant tolerates average household humidity but doesn’t want to sit directly next to a heating vent.
Before changing anything, route the symptom in this order:
Step 1 – Check location first. Is the plant near a heating vent, air conditioning unit, cold window, or exterior door? Cold drafts and forced-air heating are the most underestimated cause of brown edges. NC State Extension specifically names cold drafts and temperature drops as primary triggers for leaf loss in indoor rubber plants. Eliminate this before changing water or soil.
Step 2 – Check soil moisture at depth. Push a finger 2 to 3 inches in. Still cool and damp? Drainage is likely the issue, not drought. Brown edges from overwatering tend to be softer and often come with yellowing behind the brown. Crispy, papery edges with no yellowing usually point to dry air or drafts, not waterlogged soil.
Step 3 – Inspect leaf undersides before diagnosing. Blotchy pale or discolored patches along the margins can look similar to sun stress, dry air damage, and early pest activity. Spider mites leave fine webbing; scale insects appear as small brown bumps along stems; mealybugs leave white cottony residue. Check undersides closely before changing your care routine. The spider mite guide covers what to look for on broad-leaf plants where webbing is easy to miss.
Step 4 – Only then adjust light or watering. If location is fine, soil isn’t wet, and no pests are present, then consider whether the spot is bright enough or the watering pattern is consistent enough.
Symptom-first lookup:
- Brown, dry, and crispy at the edges only: Dry air or draft most likely. Check for vent or window proximity.
- Brown with a softer texture, or yellowing behind the brown: Moisture or drainage issue. Check how deep the wet soil goes.
- Blotchy pale or discolored patches along the margins: Inspect for pests before changing care.
- Yellow leaves dropping from the bottom up: Nearly always overwatering or cold stress, not a feeding problem.
If you’ve already gone through two or more changes in the past month and the plant is still declining, commit to the single most likely cause and wait four to six weeks before doing anything else. Serial interventions are one of the more reliable ways to make a recoverable problem harder to read.
Common Problems With Variegated Rubber Plants
Use the symptom pattern, not a single leaf, to decide what to do next.
| Symptom | First likely cause | Check this first |
|---|---|---|
| New leaves turning greener | Not enough light for the current level of variegation | Move closer to bright indirect light before changing fertilizer |
| Brown crispy edges | Dry air, heat vent, or cold draft | Check airflow and window exposure before watering again |
| Soft brown edges with yellowing | Soil staying wet too long | Test moisture 2 to 3 inches down and inspect drainage |
| Lower leaves dropping after a recent repot | Repot stress or roots kept too wet | Stop repotting, let the mix dry properly, and hold conditions steady |
| Pale blotches or fine webbing | Possible pest activity | Inspect leaf undersides closely before changing light or water |
| Whole plant looks dull after purchase | Damp nursery mix sitting in lower home light | Check pot weight, drainage, and how long the soil stays cool and wet |
Plant ID + Plant Doctor
Not sure what your plant needs?
Snap a photo in KnowYourPlant to identify the plant, check yellow leaves, spots, wilting, or pests, and get a calm next step before the problem spreads.
Cleaning and Pruning
Those large waxy leaves collect dust faster than most houseplants, and a dusty surface absorbs less light. Wipe the leaves down every few weeks with a damp cloth. The guide to cleaning plant leaves walks through the approach without damaging the leaf surface – it matters more for glossy-leaf plants than for most.
Rubber plants don’t need regular pruning. If you want to control height or remove a damaged leaf, cut cleanly just above a node and wipe the cut end gently with a damp cloth to stop the milky sap from dripping onto the leaves or pot. The sap can irritate skin, so gloves are worth it if you have sensitive skin. Leave the plant alone after pruning and don’t rush to water or fertilize – it just needs to settle.
Winter Care Note
Winter is when variegated rubber plants are most likely to show problems that quietly built up in the care routine.
Light drops significantly in most homes between October and February – even near a window that worked well all summer. If new leaves start coming in greener through those months, reduced light is the first thing to check. Running a grow light for a few extra hours in the morning or evening can compensate without requiring the plant to move.
Water needs drop too. A plant in lower light and cooler indoor temperatures uses water more slowly. Watering on the same schedule you kept in summer is a reliable way to end up overwatered by January. Check the soil more actively in winter rather than going by a fixed calendar.
Cold drafts from single-pane windows are a specific winter risk. If the window glass gets noticeably cold to the touch, moving the plant a few feet back from the glass can prevent the cold-shock leaf drop that NC State Extension identifies as one of the primary causes of leaf loss in indoor rubber plants.
Pet Safety
The ASPCA lists Ficus elastica as toxic to both cats and dogs. The milky sap in the stems and leaves can irritate skin and cause digestive problems if ingested. If you have pets that chew or investigate plants, keep this one well out of reach. The cat-safe indoor plants guide has non-toxic alternatives for spaces where animals spend most of their time.
Real User FAQ
Why is my variegated rubber plant losing its color? Almost always a light problem. The pale sections of variegated leaves contain less chlorophyll and can’t photosynthesize efficiently – so when light levels fall below the plant’s threshold, it compensates by producing more chlorophyll in new growth, which arrives greener. Move the plant closer to a bright window and give it several weeks to respond. Soil changes and fertilizer won’t bring the color back if light is the real shortfall.
How often should I water a variegated rubber plant? There’s no fixed schedule that works across all homes. Let the top 2 to 3 inches of soil dry out completely, then water thoroughly and let it drain. In winter or low-light conditions, that might mean watering every 2 to 3 weeks. In a bright spot during summer, roughly weekly. Check the soil with your finger rather than following a calendar.
Why are the leaf edges turning brown and crispy? The three most common causes are dry air from heating or air conditioning, cold drafts from windows or vents, and inconsistent watering that swings between very dry and very wet. Check the plant’s location first – is it near a vent, radiator, or drafty window? Crispy and papery without yellowing points to air or draft. Soft brown with yellowing behind it points to moisture or drainage. Work through location and soil moisture before changing anything else.
Is the variegated rubber plant toxic to cats and dogs? Yes. The ASPCA classifies Ficus elastica as toxic to both cats and dogs. The sap can cause skin irritation and gastrointestinal upset if ingested. Keep it out of reach of pets, or choose a non-toxic plant for spaces where animals spend most of their time.
Can a variegated rubber plant survive in low light? It can survive, but it won’t hold the coloring you bought it for. Low light causes the plant to produce more chlorophyll, so new leaves come in progressively greener. A grow light can compensate if you have no other options. Without supplemental light, a solid-green rubber plant is a better fit for a dim spot.
Why is my variegated rubber plant dropping leaves? Leaf drop is typically triggered by overwatering, cold drafts or sudden temperature changes, or repotting stress. NC State Extension identifies these as the primary causes of leaf loss in indoor rubber plants. If you’ve recently moved the plant, changed the watering routine, or placed it near a cold window in winter, one of those is probably the cause. Give the plant stable conditions for four to six weeks before making further changes – serial adjustments tend to compound the stress.
Should I mist my variegated rubber plant? Misting doesn’t meaningfully raise ambient humidity – the droplets evaporate too quickly. If dry air is a concern, a pebble tray with water placed under the pot or a small humidifier nearby is more effective. Avoid misting leaves before nighttime to prevent moisture sitting on the leaf surface.
How do I tell if it’s a pest problem or environmental stress? Pests and environmental stress can produce similar-looking symptoms – blotchy margins, pale patches, and leaf distortion appear in both. Before changing your care routine, inspect the undersides of leaves closely. Spider mites leave fine webbing; mealybugs leave white cottony residue; scale insects appear as small brown bumps along stems. If you don’t see any of those, environmental causes – light, drafts, soil moisture – are the more likely explanation. Adjusting watering or fertilizing before ruling out pests is a common way to delay the right fix.
Can I use a self-watering planter for a variegated rubber plant? It’s not a good fit. Self-watering planters keep soil consistently moist, which is the opposite of what rubber plants need. Roots sitting in continuously moist soil tend to decline slowly – and the symptoms, wilting and yellowing, often don’t appear until the damage has already progressed over weeks. Standard pots with working drainage holes give you much more control over soil moisture.
Before You Settle It in Its Permanent Spot
Run through these before committing to a location:
- Is there several hours of bright, indirect light reaching that spot daily?
- Does the pot have working drainage?
- Is the spot near a heating vent, cold window draft, or air conditioning unit?
- If you have cats or dogs, is the plant genuinely out of reach?
Yes, yes, no, and yes – you’re set. A variegated rubber plant rewards a thoughtful first placement more than most. Once it’s settled in a good spot with consistent watering, the ongoing routine is genuinely low-maintenance. The work is mostly in the setup.
Download KnowYourPlant for personalized plant care reminders and diagnosis support: https://apps.apple.com/us/app/knowyourplant/id6761640874
Methodology Note
This guide was cross-checked on June 20, 2026 against NC State Extension for indoor ficus care and leaf-drop triggers, Proven Winners guidance for Ficus elastica ‘Tineke’ light and watering expectations, and ASPCA toxicity guidance for pet safety. The troubleshooting emphasis also reflects recurring grower questions about fading color, brown edges, damp nursery soil, repot stress, and pest confusion. Those reader patterns help show where people get stuck, but they are used as qualitative signal rather than proof on their own.