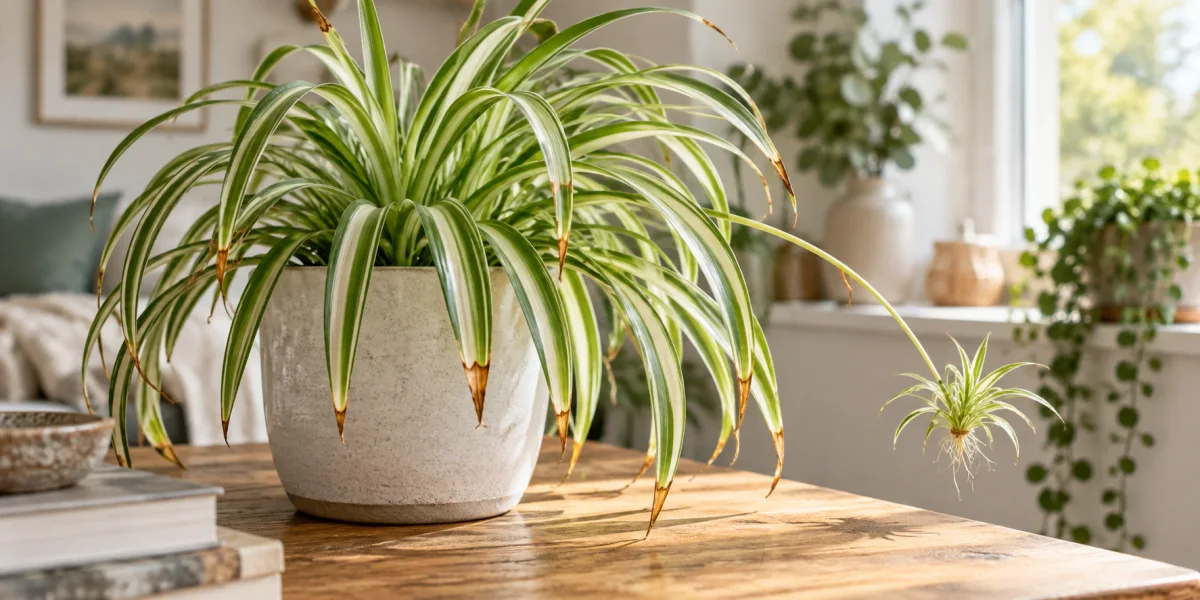
You noticed the tips of your spider plant going brown and crispy, and now you’re wondering whether you did something wrong or whether the plant is just being difficult. Spider plant brown tips are one of the most common houseplant frustrations, and the usual advice to “water less” or “let your tap water sit overnight” doesn’t always solve it. Here’s the core reason: brown tips rarely have just one cause, and the damage you can already see is permanent.
Spider plant brown tips are dead leaf ends caused by one or more stressors, commonly water-quality or fertilizer salts, dry conditions, direct sun, or root trouble. Once the tissue is brown and crisp, it will not turn green again. A successful fix shows up in cleaner new growth.
That last point changes what you’re actually trying to do. If you’ve been trimming the same tips every few weeks and waiting for the leaf ends to recover, you’re measuring the wrong thing. What you want is for the next leaf that unfurls to come in clean. Everything below is about figuring out which stressor to fix first so that actually happens.
Identification Snapshot
If this is a true spider plant (Chlorophytum comosum) problem, the plant usually gives you three quick ID clues before you ever diagnose the brown tips:
- Arching, strap-like leaves, often green with a white center stripe or white margins
- Mature plants that make baby plantlets on long stolons
- Browning that starts at the very tip while most of the leaf stays green and firm
NC State Extension’s Plant Toolbox describes spider plant’s linear leaves and long stolons that produce plantlets and flowers. That matters here because true tip burn starts at the end of an otherwise recognizable spider-plant leaf, rather than with a whole-leaf collapse.
Lookalikes and Confused-With Cases
Before treating the plant, make sure you are not lumping different problems into the same “brown tips” bucket.
| What you see | Most likely issue | Why people confuse it with tip burn |
|---|---|---|
| Dry brown ends but healthy green leaf blades | Water quality, salt buildup, or dry-air tip burn | The plant still looks broadly healthy, so owners assume nothing is actively wrong |
| Browning mostly on the window-facing side with washed-out patches | Direct sun scorch | The tissue still dries at the ends, so it gets mistaken for watering trouble |
| Brown tips plus yellowing lower down the leaf or a soft crown | Root stress from staying too wet | Brown tips are visible first, but the real problem is further down in the plant |
| Crispy ends after a heat or AC shift | Low humidity plus dry soil swings | The texture looks similar to fluoride damage unless you look at the room conditions too |
Care Cards
- Light: Medium to bright indirect light is ideal. Direct sun can scorch leaves.
- Watering rhythm: Water when the top inch dries, not on a rigid weekly schedule.
- Water quality: If tip burn keeps returning, distilled water or rainwater is a cleaner test than letting tap water sit out.
- Humidity: Medium humidity gives cleaner growth, especially in heated winter rooms.
- Feeding: Use diluted fertilizer lightly, because excess salts can create the same browning you are trying to stop.
What Most Care Guides Miss
Most articles on this topic list five or six possible causes and suggest fixing them all at once. That creates a new problem: you change the water, flush the soil, move the pot, and adjust your fertilizer schedule in the same week, and you still can’t tell what was actually causing the damage.
The most consistently missed piece is this: spider plants can be sensitive to chemicals and dissolved salts in tap water. Letting water sit out is not a reliable test for every water system because it does not remove fluoride and does not address every disinfectant. If the tips keep browning, a short trial with rainwater or distilled water is a cleaner way to test the water-quality hypothesis.
Wisconsin Horticulture lists salt accumulation, low humidity, dry soil, and tap-water chemicals among the possible causes of brown tips. That means switching water sources is only one test: keep other care stable and watch new leaves rather than expecting dead tip tissue to turn green.
The other thing most guides skip: brown tips don’t tell you whether damage is still actively spreading or whether it stopped weeks ago. An old stressor you already corrected will leave brown tips behind, but they won’t continue into fresh tissue. A stressor that’s still active will keep moving. Learning to read the difference is more useful than trimming.
Start Here: A Diagnostic Pathway
Before changing anything, answer these questions in order. Stop at the first one that fits.
Step 1 – Are there signs beyond brown tips? Look at the base of the plant and sniff the soil. If leaves are yellowing further down the leaf (not just at the tips), the stem base feels soft, or the soil smells sour, skip straight to the overwatering and root stress section. Brown tips plus any of those signals usually point to drainage or root problems, not water chemistry.
Step 2 – Is the browning on one side of the plant, facing a window? If tips are browning specifically on leaves angled toward a south- or west-facing window, and the nearby leaf tissue looks pale or washed out, the most likely cause is direct sun scorch. Move the plant back from the glass or add a sheer curtain, then watch whether new leaves emerge without the same pattern.
Step 3 – Is there a white or pale crust on the soil surface or the inside rim of the pot? That crust is mineral and salt residue from tap water and fertilizer accumulating over many waterings. Flush the soil thoroughly – water slowly until water drains freely from the bottom – and consider pulling back on fertilizer frequency.
Step 4 – Is the indoor air very dry? Are tips crispy rather than soft or yellow? A crispy texture (not mushy, not yellow, just dry and papery) alongside dry indoor air supports a humidity or dry-soil hypothesis. This is especially common in winter when heating systems run continuously.
Step 5 – If none of the above fit, test water quality. If the tips are simply brown and crispy with no soil crust, no one-sided pattern, no base softness, and moderate humidity, tap-water chemicals remain plausible for spider plants. Switch to distilled water or rainwater, keep all other care stable, and watch new growth over four to six weeks.
This sequence isn’t rigid – stressors can stack – but it gives you a single most-likely cause to test first rather than changing everything at once.
The Cause-to-Clue Table
Each stressor leaves slightly different evidence. This table covers what to look for before you make any changes.
| Cause | What you’ll see | First check |
|---|---|---|
| Fluoride / tap water | Tips brown, rest of leaf stays healthy green | Switch to distilled or rainwater for 4–6 weeks; judge new growth only |
| Fertilizer salt buildup | White crust on soil surface or pot rim, tips brown | Flush soil thoroughly; reduce or pause fertilizer |
| Low humidity / dry air | Crispy tips, sometimes leaf edges slightly curled | Check room humidity; group plants or add a pebble tray |
| Direct sun scorch | Brown tips on leaves facing the window, pale nearby tissue | Move plant back from glass or add a sheer curtain |
| Overwatering / root stress | Brown tips plus yellowing lower on the leaf, soft base, sour soil smell | Check drainage; let soil dry between waterings |
Use this as a first-pass filter before making multiple changes at once. Pick the most likely match, make one change, and give it four to six weeks to show up in new growth.
Common Mistakes That Make Brown Tips Worse
A few habits feel like the right response but actually delay the fix or add new stressors.
Leaving tap water out overnight and considering the problem solved. Sitting water does not remove fluoride and may not address every disinfectant used by a water utility. If the tips keep browning, test a different water source rather than assuming the timing solved the problem.
Trimming brown tips repeatedly and expecting the plant to recover. Trimming is cosmetic. It makes the plant look neater, and that’s it. If an active stressor is still present, the next leaf to emerge will develop brown tips regardless of how frequently you trim the old ones. Trim once for appearance; fix the underlying cause to prevent new damage.
Changing too many variables at once. Switching water source, flushing the soil, moving the pot, and halving the fertilizer dose in the same week means you have no idea what worked. If the tips eventually improve, you might keep all four changes permanently when only one was necessary. If they don’t improve, you’ve run out of obvious first moves. Change one variable, give it several weeks, then evaluate.
Measuring success by looking at existing brown tips. Existing tips stay brown. Always. If you fixed the cause last month, the old tips don’t know that – they’re dead tissue. The only meaningful evidence that a change worked is whether new leaves emerge without browning. Set a specific “watch new growth” mindset from the start and you’ll stop second-guessing changes that are actually working.
Over-fertilizing to push growth. Some owners assume that feeding more will help the plant push through damage. Spider plant does not need heavy fertilizer, and excess feeding raises soluble salts in the potting mix. Clemson Cooperative Extension lists excess fertilizer and high-soluble-salt water as causes of spider-plant tip burn.
Common Problems
These are the most common spider-plant problems that travel with brown tips, and each one changes what you should test first.
| Problem pattern | What it usually points to | Best next step |
|---|---|---|
| Fresh leaves open with brown tips right away | Active fluoride or soluble-salt stress | Change the water source or flush the pot, then judge only the next round of growth |
| Brown tips plus pale patches on the bright side of the plant | Too much direct sun | Move it back from the window or filter the light |
| Brown tips plus yellowing, sour soil, or a soft base | Overwatering or drainage failure | Check the roots, drainage holes, and dry-down time before watering again |
| Brown tips that worsen every winter | Low humidity layered onto normal care | Raise local humidity instead of only watering more |
| Brown tips with crusty soil and slow growth | Fertilizer or mineral buildup | Flush the pot thoroughly and reduce feeding frequency |
Cause by Cause
Tap Water and Fluoride
NC State Extension notes that chlorine and fluorides in tap water can contribute to spider-plant tip burn. Because water treatment differs by utility, leaving a container out overnight is not a reliable way to rule water quality in or out.
If water quality is the strongest match, use distilled water or collected rainwater for four to six weeks while leaving light, fertilizer, and watering rhythm unchanged. Judge only leaves that develop after the switch.
Salt Buildup from Fertilizer
Clemson Cooperative Extension identifies excess fertilizer and water high in soluble salts as causes of leaf tip burn in spider plant. Dissolved minerals can accumulate in potting mix over repeated watering and feeding, especially when little water drains from the pot.
The visible sign: a white or pale crust on the soil surface or along the inner rim of the pot. Flushing the soil – running water slowly through the pot until it drains freely from the bottom – helps bring salt levels down. For timing and dosing guidance, the fertilizing indoor plants guide covers how to feed without buildup and when to skip feeding altogether.
Spider plants do not need heavy fertilizing. Wisconsin Horticulture recommends light feeding and notes that excessive fertilizer can brown the tips, so follow the product label and reduce or pause feeding when growth slows.
Low Humidity and Dry Air
Spider plant does well in moderate humidity. Central heating and air conditioning both strip indoor air significantly. When humidity drops, leaf tips can desiccate before the plant can compensate, leaving a crispy rather than soft or yellow texture.
Wisconsin Horticulture lists low humidity and excessively dry soil alongside salt accumulation and tap-water chemicals as possible causes of tip browning. A nearby humidifier can help in persistently dry rooms; keep any pebble-tray water below the pot base so the root ball does not sit in water. For more detail on indoor humidity, the humidity guide for indoor plants covers measurement and practical fixes.
Direct Sun Scorch
Spider plant prefers medium to bright indirect light. NC State Extension describes it as intolerant of direct sunlight, while Clemson advises avoiding strong midday sun. A spot near hot glass can create one-sided scorch that resembles other types of tip burn.
The distinguishing detail: scorched tips tend to appear on the side of the plant facing the glass, and the nearby leaf tissue may look pale or washed out rather than healthy green. The fix is simple: move the plant a step back from the glass, hang a sheer curtain, or find a spot with bright ambient light rather than direct rays. If you’re supplementing with artificial light, the grow lights for indoor plants guide covers appropriate intensity for indirect-light plants like spider plant.
Overwatering and Root Stress
Consistently wet soil can accompany brown tips too, but root trouble usually brings broader signals: yellowing further down the leaf, a soft or spongy base, wilting despite wet mix, or brown, soft roots. Wisconsin Horticulture notes that overwatering or poorly drained soil can lead to root rot in spider plant.
Spider plant prefers to dry out slightly between waterings. If the top inch of soil is still wet a few days after watering, either the pot lacks drainage or you’re watering too frequently. The overwatered plant signs and fixes guide covers the progression from mild overwatering to root rot and when a full repot becomes necessary.
Seasonal Patterns to Know
Brown tips don’t happen at the same rate year-round. Two seasons in particular push the most common stressors to their peak.
Winter. Central heating runs continuously in cold months, pulling indoor humidity down significantly. Spider plant sits at moderate-humidity preference, which means a room that was fine in October can become a dry-air problem by January. Tips that were stable through autumn may start browning as the heating season kicks in. This is also when most owners fertilize less or stop entirely, so salt buildup from autumn feeding can be a compounding factor. Running a small humidifier nearby or moving the plant to a kitchen or bathroom where ambient humidity is naturally higher can help.
Summer. The sun’s angle shifts in summer, which means a south- or west-facing window that posed no direct-light problem in February may be hitting your spider plant with midday sun by June. If brown tips appear seasonally on the window-facing side of the plant and weren’t there in cooler months, a slight repositioning is usually all that’s needed.
Spring and autumn are the most forgiving seasons for spider plant. Growth is active in spring without the worst of summer’s sun intensity, and autumn growth tapers before the heating season dries out the air. If you’re making care changes, spring is the easiest time to test them because you’ll have several weeks of new growth to evaluate before conditions shift.
Old Damage vs. Active Damage
This is the diagnostic question that matters most, and most care guides skip it.
Brown tips are permanent. Once leaf tissue is dead, changing the care routine can prevent future damage but cannot restore that tissue.
What you’re watching for after any change is whether new growth comes in with cleaner tips. If the next several leaves unfurl without browning, the fix worked. If fresh leaves continue developing brown tips, at least one stressor is still active.
Two patterns to help you read the situation:
- Tips are brown but not spreading: The stressor may already be resolved, or the damage level is stable. Watch new growth rather than trimming.
- Tips are browning on newly emerged leaves: Something is still actively stressing the plant. The diagnostic pathway and cause-to-clue table above are the place to start.
Trimming is cosmetic only. Use clean scissors and cut at a slight angle to echo the leaf’s natural taper. It doesn’t hurt the plant, and it doesn’t fix anything either.
The New Growth Test
This is the most reliable way to confirm whether a change you made actually worked.
When you switch a care variable – water source, fertilizer frequency, pot position, humidity level – make a note of the change and the date. Then ignore existing brown tips entirely. Over the next four to six weeks, watch only the leaves that were not yet visible when you made the change. A leaf that was just starting to unfurl doesn’t count; it may have already been stressed. You want leaves that emerged entirely after the change.
If those new leaves come in with clean, green tips: the change addressed the active cause.
If those new leaves also develop brown tips: the cause is still active, or a second stressor is stacking on top of the one you addressed.
Keep all other care variables stable while you test. Changing water source and moving the plant and flushing the soil in the same week makes the test unreadable. One change, several weeks of new growth, honest observation. That’s the whole experiment.
Spider plant grows actively enough in spring and summer that you’ll usually have evaluable new leaves within four to six weeks. In winter, growth slows, so allow more time – or hold major care changes until spring when new growth gives you a faster answer.
Pet Safety
The ASPCA lists spider plant as non-toxic to cats and dogs. Keep chewed leaves and damaged pots cleaned up, and contact a veterinarian if a pet develops symptoms after eating any plant material.
If you’re choosing plants with pets in mind, the cat-safe indoor plants guide covers the broader options alongside spider plant.
How to Prevent Brown Tips Going Forward
- Test distilled water or collected rainwater if tap-water sensitivity is the strongest match.
- Fertilize lightly. Spider plant doesn’t need heavy feeding, and autumn through winter is a natural rest period.
- If you see mineral crust or have fertilized heavily, leach the mix with plain water and let it drain completely; do not flush on a rigid calendar.
- Keep the plant in bright, indirect light, away from direct midday sun – and recheck window positioning when the season changes.
- Water when the top inch of soil feels dry rather than on a fixed weekly schedule.
- Maintain moderate humidity, especially in heated or air-conditioned rooms during winter months.
Spider plant is genuinely resilient. It forgives inconsistency better than most houseplants. But its tip sensitivity is real, and it responds better to one stable change than to several dramatic interventions at once. Cleaner water, gentler light, and a lighter hand with fertilizer show up in new growth over the following weeks, not in tips that have already turned.
Use the spider plant care guide for the full light, watering, propagation, and seasonal baseline. If damage extends beyond brown tips into spots, holes, yellowing, or distortion, compare those signals in the leaf-damage identification guide before changing several care variables.
Methodology
This guide was source-reviewed on September 9, 2026. Identification, water-quality, light, fertilizer, humidity, and root-rot claims were checked against the linked guidance from NC State Extension, Wisconsin Horticulture, and Clemson Cooperative Extension. Pet-safety status was checked against the ASPCA’s current plant database. The diagnostic pathway is a way to test one plausible cause at a time; it is not a guarantee that every brown tip has a single cause.
Frequently Asked Questions
Why does my spider plant have brown tips even though I water it regularly?
Regular watering does not prevent brown tips if water quality or accumulated salts are part of the problem. NC State Extension notes that chlorine and fluorides in tap water may contribute to tip burn. If the tips keep browning, try rainwater or distilled water while leaving other care stable, then judge leaves that develop after the switch.
Will brown tips on my spider plant turn green again?
No. Once the leaf-tip tissue is dead, it will not recover its color or texture. The goal after correcting a stressor is to watch whether the next emerging leaves come in without browning. That is the useful signal that the change worked. Trimming brown tips is fine for appearance, but it does not correct the cause.
Does letting tap water sit overnight fix the problem?
Not reliably. Leaving water out does not remove fluoride, and water treatment differs between utilities, so an overnight container is not a dependable way to rule water quality in or out. If the tips keep browning, compare new growth during a trial with distilled water or collected rainwater while leaving the rest of the care routine unchanged.
How do I know if salt buildup is causing the brown tips?
A white or pale crust on the soil surface or inside edge of the pot makes salt buildup more plausible. Dissolved minerals from water and fertilizer can accumulate in potting mix over time. To address it, water the pot slowly and thoroughly until water flows freely from the drainage holes, then let it drain completely. Clemson Cooperative Extension identifies excess fertilizer and high-soluble-salt water as causes of tip burn in spider plant.
How much light does a spider plant need to avoid tip scorch?
Spider plant does well in medium to bright indirect light. NC State Extension describes it as intolerant of direct sunlight, while Clemson advises avoiding strong midday sun. If damage is concentrated on the window-facing side, move the plant back from the glass or filter the light and watch the next leaves.
Can too much fertilizer cause brown tips?
Yes. Fertilizer contributes soluble salts to the potting mix, and excessive fertilizer is a documented cause of spider-plant tip burn. Follow the fertilizer label, feed lightly, and reduce or pause feeding when growth slows. If you have been fertilizing frequently or at full strength, reducing the dose and leaching the mix with plain water can help when the pot drains freely.
My spider plant has brown tips and yellow leaves. What does that mean?
Brown tips plus yellowing further down the leaf makes a root problem more plausible than water quality or dry air alone. Yellowing, a soft base, persistently wet mix, or soft brown roots are reasons to inspect watering and drainage. Wisconsin Horticulture notes that overwatering or poorly drained soil can lead to root rot in spider plant. Check that the pot drains, allow the mix to dry slightly between waterings, and remove decayed roots before repotting only when an inspection confirms rot.
How do I know when a care change has actually worked?
Watch only leaves that emerge entirely after you made the change – leaves that were already developing when you changed the water or moved the pot may already be stressed. Give it four to six weeks. If new leaves come in with clean, green tips, the fix addressed the active cause. If new leaves also brown at the tips, the cause is still active or a second stressor is contributing. This new growth test is the only reliable way to evaluate a care change, since existing brown tips stay brown regardless of what you do.
How do I trim brown tips without making the plant look worse?
Use clean, sharp scissors. Dull blades tear the tissue rather than cutting it, leaving ragged edges that brown further. Cut at a slight angle that mimics the natural taper of a spider plant leaf, staying just inside the green tissue rather than cutting far back into the leaf. The tip will still show a thin line where you cut, but it blends in far better than the original brown end. If you’re trimming multiple plants, clean your scissors with rubbing alcohol between plants to avoid spreading any pathogens.
Sources reviewed September 9, 2026: NC State Extension — Spider Plant, Wisconsin Horticulture — Spider Plant, Clemson Cooperative Extension — Spider Plant, and ASPCA — Spider Plant. Reviewed by the KnowYourPlant editorial source review.